


Preserving your pet’s paw print is a meaningful way to celebrate your bond and create lasting memories. This guide walks you through creating paw print art using simple materials like air-dry clay, non-toxic paints, or ink pads. Whether you’re making keepsakes, ornaments, or memorials, the process is straightforward and pet-safe. Here’s what you need to know:
- Materials: Choose air-dry clay for ease, polymer clay for durability, or budget-friendly salt dough. Use pet-safe paints or ink for painted prints.
- Steps: Prepare materials, ensure your pet is comfortable, and press their paw gently into clay or apply paint for prints.
- Display Ideas: Frame prints, create garden stones, or turn them into jewelry. Personalize with names or dates for added sentiment.
- Memorials: Incorporate paw prints into urns, shadowboxes, or engraved markers to honor pets who’ve passed.
Creating paw prints is easy, meaningful, and a beautiful way to cherish your pet’s legacy. Read on for detailed steps, tools, and creative ideas.
🎨🐾 DIY Paw Print Painting Adorable Keepsake! 🐾🎨Learn How to Make a Homemade Paw Print Painting
Materials and Supplies You'll Need
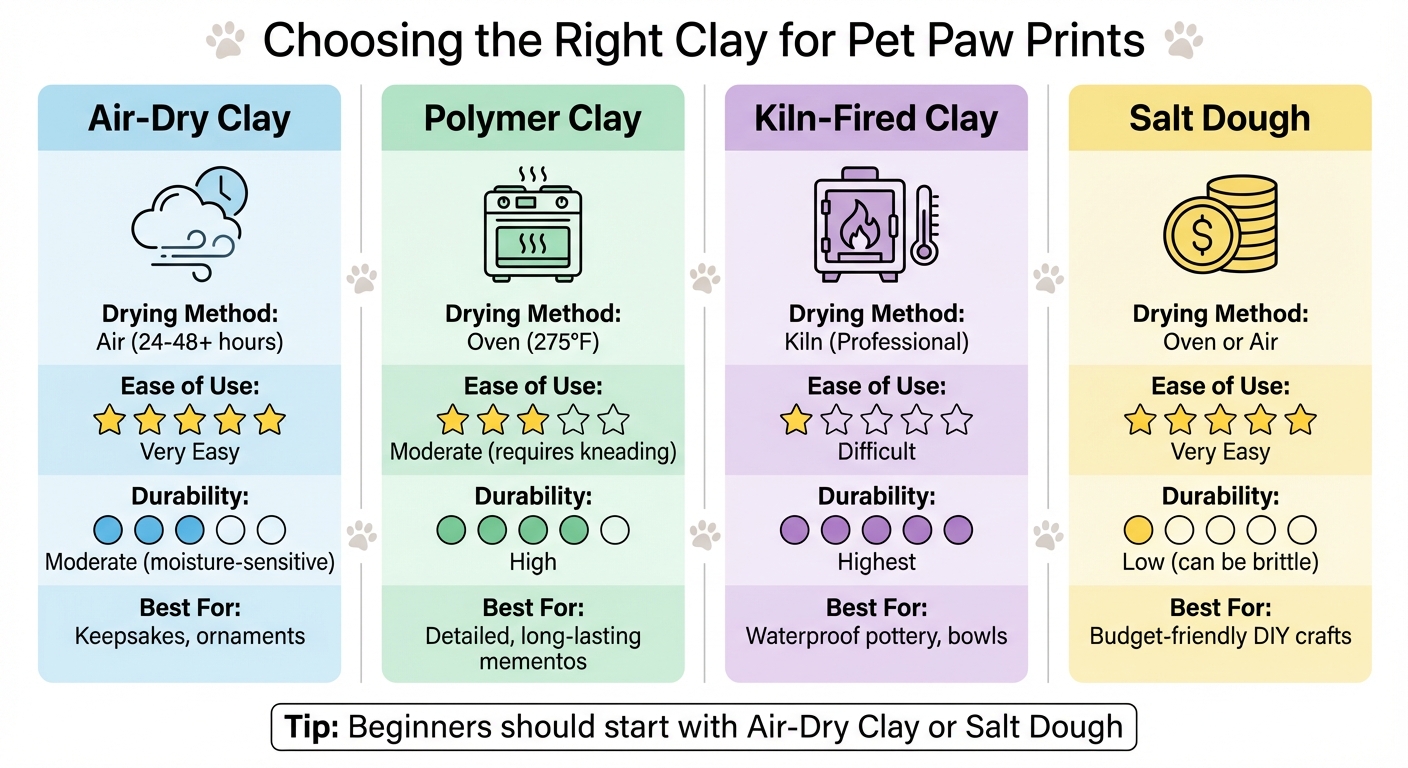
Pet Paw Print Clay Types Comparison Guide
Having the right materials from the start can make crafting paw print art a lot easier and more enjoyable for both you and your furry friend. You don’t need to splurge on fancy supplies - most of what you need can be found at craft stores, online, or even in your own home. Here’s a breakdown of the essentials for creating safe and lasting paw print keepsakes.
Types of Clay for Paw Prints
When it comes to clay, there are a few options to consider, depending on your needs and skill level.
Air-dry clay is perfect for beginners. It doesn’t require baking or special equipment - just let it harden naturally, which usually takes 24 to 48 hours. Crayola Air-Dry Clay is a popular pick because it’s pet-safe and easy to work with. As Tori Holmes from Freshpet explains, "I'd recommend using the Crayola Air-Dry Clay as it is pet safe and your creations can be left out to harden naturally - no kiln or oven necessary!"
Polymer clay, also known as oven-bake clay, gives you more time to adjust and perfect the paw print since it stays soft until baked. A favorite among pet owners is ClayPaws® Soft White, which is easy to knead and ideal for detailed impressions. Just remember, it needs to be baked at around 275°F and used within 30 days of opening. Positive Impressions notes, "If the clay is left to air dry [instead of being baked], it will dry out unevenly and crack."
Salt dough is a budget-friendly option you can make at home with simple ingredients: 1 cup of flour, 1/2 cup of water, and 1/2 cup of salt. While it’s inexpensive and easy to prepare, it doesn’t capture as much detail as other clays. Dalmatian DIY warns, "With salt dough, it's really important to ensure that your dog doesn't lick or eat any... the excessive salt would be very unhealthy and potentially toxic to your pet."
| Clay Type | Drying Method | Ease of Use | Durability | Best Application |
|---|---|---|---|---|
| Air-Dry Clay | Air (24-48+ hours) | Very Easy | Moderate (moisture-sensitive) | Keepsakes, ornaments |
| Polymer Clay | Oven (e.g., 275°F) | Moderate (requires kneading) | High | Detailed, long-lasting mementos |
| Kiln-Fired Clay | Kiln (Professional) | Difficult | Highest | Waterproof pottery, bowls |
| Salt Dough | Oven or Air | Very Easy | Low (can be brittle) | Budget-friendly DIY crafts |
Paint and Painting Supplies
If you’re going for a painted paw print, it’s important to use non-toxic, washable paints that are safe for pets. Water-based paints, tempera paints, and washable finger paints all work well. In a 2012 DIY guide by Pretty Fluffy, Sarah Dickerson recommended Martha Stewart’s non-toxic, washable craft paint, noting it cleaned up easily with dish soap and water.
For those who prefer ink, the ColorBox Pigment Ink Pad is a safe and reliable choice. Rebecca from Comfort Connects highlighted its non-toxic, acid-free formula, though it does take about 24 hours to fully dry. If you’d rather avoid wet ink altogether, inkless kits are another option - they capture the print without your pet’s paw ever touching the ink.
To apply the paint or ink, tools like soft paintbrushes, sponges, or foam brushes work well. For surfaces, consider stretched canvases, thick cardstock, or wooden frames. These materials hold up nicely and make for beautiful keepsakes.
Other Helpful Tools
A few extra tools can make the process smoother and improve the final result. A rolling pin is great for flattening clay evenly, and cookie or biscuit cutters can help shape your creation. Toothpicks are handy for cleaning out any trapped fur or debris from the impression before it dries. Keep some treats on hand to reward your pet, and have a damp washcloth ready to clean their paw immediately after taking the print. These small steps ensure a stress-free experience for both you and your pet!
How to Make Clay Paw Prints
Preparing and Kneading the Clay
Start by warming up the clay. Knead it thoroughly until it’s soft enough that pressing your thumb into it leaves a detailed impression. According to Dalmatian DIY, "When you knead and massage the clay, it warms and softens, becoming more malleable, which is what we need for sculpting or taking impressions. Softer clay makes it easier to take clear prints with minimal pressure." Similarly, The Craft Academy advises, "If you can't get a good impression of your hands or fingers, it means that the clay is still too hard and you will be unable to get a good Clay Paw Print of your Dog."
Once the clay is soft, roll it out to a thickness of about 1/2" to 1" (approximately 0.75 cm to 1 cm). This thickness ensures durability without cracking. For a smooth surface, roll the clay between two sheets of cling film or parchment paper - this not only prevents sticking but also rounds the edges naturally. If you’re working with stiff store-bought Play-Doh, pop it in the microwave for about 25 seconds to soften it before kneading. To keep unused clay from drying out while you work, wrap it in a damp towel or store it in an airtight container.
With your clay prepped and ready, it’s time to move on to capturing that perfect paw print.
Getting a Clear Paw Impression
Creating a clean paw impression requires a bit of patience and the right technique. Start by making sure your pet’s paw is free of dirt and debris - wipe it with a damp cloth if needed. Trim any long fur between the paw pads and ensure the claws are trimmed to prevent scratching or interfering with the print.
Position your pet comfortably, ideally lying down. One person can hold and distract your pet with treats while the other presses the clay. Apply gentle, even pressure to capture the details of each paw pad.
| Pet Size | Recommended Impression Depth | Technique Tip |
|---|---|---|
| Cats | 1/8" to 1/4" | No oil needed; claws may or may not show |
| Small Dogs | 1/4" | Use two people; one to hold, one to press |
| Large Dogs | 1/4" to 3/8" | Have the dog lie down; ensure claws are visible |
To avoid the clay sticking to your pet’s fur, lightly coat their paw pads with vegetable or coconut oil before pressing. This helps with a clean release and prevents tugging on sensitive fur. Keep at least a 1/2" margin between the paw print and the edge of the clay to avoid distortion. If the print smudges, simply re-roll the clay and try again. It’s a good idea to take 3–4 impressions during one session so you can choose the clearest one once the clay settles.
Adding Names, Dates, and Decorations
While the clay is still wet, personalize it with your pet’s name, a date, or a short message. Use alphabet stamps for neat lettering, or carefully carve details with a toothpick or skewer. If any stray hairs get caught in the clay, gently remove them at this stage.
If you want to hang the finished piece, poke a hole near the top edge using a straw or skewer before the clay dries. For extra flair, consider pressing small patterns around the edges or adding a heart shape next to the paw print. Work quickly during this step, as air-dry clay begins to set within a few hours, and polymer clay needs to be baked to harden completely.
Once decorated, set the piece aside to dry in a cool, dry place. Avoid heat sources to prevent cracking. As Mama.Papa.Bubba. suggests, "You want the drying process to be sloooow to avoid cracking. In other words, air drying is best, and somewhere away from a heat source is optimal."
How to Make Paint Paw Prints
Preparing Your Workspace
Start by gathering all the supplies you'll need and setting up a sturdy, flat workspace. To keep your paper or cardstock in place, secure it with heavy objects like bricks or books. This will prevent it from slipping when your pet's paw makes contact.
Protect your surfaces with old towels or drop cloths. Keep a bowl of warm, soapy water and a clean towel nearby for quick cleanup. Grooming or baby wipes can also come in handy for any unexpected messes. Before you begin, spend a few minutes gently massaging your pet’s paws. This helps them relax and get used to the sensation, making the process smoother.
"Remember to also be as calm as possible yourself. This will help to assure your pet that nothing is wrong." - DogTime
Check your pet’s paw pads for excessive hair and trim if necessary. To make cleanup easier, apply a thin layer of paw balm or canine moisturizing butter. This not only softens the skin but also prevents the paint from sticking too much.
Once your workspace is ready and precautions are in place, you’re all set to move on to the painting step.
Applying Paint to Your Pet's Paws
Using the right materials and a gentle approach is key to creating a safe and lasting paw print. Always choose pet-safe, non-toxic, washable paints for this project. Avoid regular house paints or oil-based paints, as these can contain harmful solvents that may pose risks if inhaled or ingested by your pet.
"Most side-effects from paint for pets comes from eating it or inhaling the fumes of common household paints or oil-based paints that contain harmful solvents." - Instructables
Pour a small amount of pet-safe paint into a disposable container or onto a sponge. Apply the paint evenly to your pet’s paw using the sponge, or gently press their paw onto the paint-soaked sponge. If possible, have someone assist by holding and distracting your pet with tasty treats while you focus on the painting.
After the paint is applied, press your pet's paw firmly onto the paper for a few seconds. Lift it straight up to avoid smudging the print. Immediately wash their paw in the warm, soapy water you prepared earlier to prevent them from licking any remaining paint. Take several prints during one session so you can pick the best one later.
"The shorter you keep this project, the better. Your dog will be happier, your results will be prettier, and you'll have fewer messy accidents." - Gregory Iacono, Writer, Hepper
Making Patterns and Designs
If you’d like to get creative, consider arranging the paw prints into patterns such as circles, hearts, or even a walking trail on a large canvas. Experiment with different colors for each print or layer them in varying shades to create a gradient effect. These designs can make your artwork even more meaningful, serving as a unique tribute to your pet. For a fun twist, try the "walking method" - apply a thick line of paint on a long strip of paper and guide your pet along it with treats to capture their natural walking pattern.
Once the paint has dried completely (this can take up to 24 hours), seal your artwork with Krylon UV Archival Spray in a well-ventilated area to preserve it.
sbb-itb-c538f2f
Sealing and Displaying Your Paw Print Art
Now that your paw prints are done, it’s time to protect and display them so they can be cherished for years to come.
How to Seal and Protect Your Art
The sealing process depends on the material you worked with. For air-dry clay, let it harden completely without disturbance. If you used salt dough, bake it at 200°F for 2–3 hours, keeping an eye on it to prevent cracking. For water-based clay, professional glazing followed by kiln-firing ensures durability.
When working with paper prints, archival-quality ink is a must to avoid fading over time. These inks may take up to 24 hours to dry fully, so keep the print in a dust-free space during this period. For plaster of paris creations, you can enhance them with acrylic paints and secure any added decorations using craft glue.
Sealing your artwork not only protects it but also ensures it remains a lasting tribute to your pet. Once sealed, you’re ready to display your creation in a way that best celebrates your furry friend.
Ways to Display Your Paw Prints
After sealing, the next step is deciding how to showcase your paw print art. Framed canvases are a classic choice, perfect for hanging single prints or artistic arrangements on your walls. Shadowboxes offer a more personalized touch, combining paw prints with keepsakes like collars, tags, or photographs for a heartfelt display. Clay impressions can even be turned into wearable jewelry, such as necklaces, bracelets, or rings.
For outdoor displays, you have plenty of creative options. Garden stepping stones made from resin, granite, or limestone can feature paw prints alongside inscriptions, adding a personal touch to flower beds or pathways. Memorial plaques often pair prints with poems and photos, while wind chimes with paw-shaped pendants create a soothing and sentimental tribute. If you’re making ornaments, don’t forget to punch a small hole in the clay before it dries so you can thread a ribbon or string later.
Each display choice not only highlights your artwork but also serves as a meaningful way to honor your pet’s memory.
| Display Method | Best Material | Indoor/Outdoor |
|---|---|---|
| Stepping Stones | Resin, Granite, or Limestone | Outdoor |
| Jewelry | Clay Charms or Engraved Metal | Wearable |
| Shadowboxes | Paint on Paper/Canvas or Clay | Indoor |
| Wind Chimes | Wrought Iron or Brass | Outdoor |
| Pottery | Glazed/Fired Clay | Indoor |
| Ornaments | Air-Dry Clay | Indoor |
Using Paw Prints in Pet Memorials
Paw print art holds a special place in pet memorials, offering a heartfelt way to preserve the memory of a beloved companion. Much like a fingerprint, a pet's paw print is one-of-a-kind, serving as a meaningful keepsake to honor their life and legacy.
Memorial Keepsakes with Paw Print Designs
Pet Memory Shop provides a variety of memorial items featuring your pet's paw print. One of the most cherished options is personalized jewelry, such as engraved bracelets and necklaces, priced between $69.99 and $99.99. These wearable mementos allow you to carry a piece of your pet with you wherever you go.
For those looking to commemorate a lifelong bond, decorative urns adorned with paw print designs are a touching choice. Popular styles like the "Acacia Wood Paw Print" or "Pawprints to Heaven" series are available for $24.99 to $59.99. The Wooden Pet Photo Urn, a customer favorite, has received 143 glowing reviews. Additionally, custom burial markers crafted from granite or limestone can be engraved with your pet's paw print, name, and dates. Prices for these markers range from $89.99 to $199.99, with the "In Loving Memory" Heart-Shaped Burial Marker earning 152 reviews.
Pet Memory Shop has gained the trust of over 10,000 customers, boasting a 4.9/5 star rating from 11,697 reviews. Customers frequently commend the "excellent quality" and "seamless process" during such emotional moments.
These keepsakes can also be incorporated into larger memorial displays, creating a lasting tribute to your pet's memory.
Building a Memorial Display
A shadowbox display is a thoughtful way to combine several cherished items, such as your pet's collar, ID tag, photo, and paw print, into one layered tribute. The "Pawprints Left By You" Memorial Frame, a popular choice, has received 65 positive reviews.
For outdoor memorials, consider placing paw-print-shaped garden stones or engraved markers in your pet's favorite spot in the yard. These garden tributes typically cost between $39.99 and $49.99. Wind chimes featuring paw print designs can add a soothing and reflective element to your memorial garden.
Conclusion
Creating paw print art is a heartfelt way to preserve your pet's unique mark. Much like human fingerprints, no two paw prints are the same, making these keepsakes truly special. Whether you choose clay impressions, paint prints, or incorporate them into memorial pieces, you’re capturing something irreplaceable.
Given that most dogs live between 10 and 15 years, the time to create these memories is limited. Taking the opportunity to craft these keepsakes while your pet is healthy and relaxed ensures the best results. Once they’ve passed, the chance to get a clear impression is gone. The steps and techniques outlined earlier in this guide can help you create prints that are as detailed and meaningful as possible.
These paw print keepsakes serve as lasting tributes, allowing you to hold onto your pet’s memory in a tangible way. Whether displayed in a shadowbox, turned into jewelry, or placed in a memorial garden, they offer comfort by keeping your pet close. Beyond preserving memories, they also celebrate the joy and love your pet brought into your life.
With the right materials and a bit of patience, you can create a tribute that truly honors your pet. For additional ideas and high-quality memorial products, visit Pet Memory Shop (https://petmemoryshop.com).
FAQs
What materials are safe to use for making pet paw print art?
The safest materials for making pet paw print art are non-toxic and safe-for-pets options. Here are some great choices:
- Air-dry modeling clay: Soft clays like Crayola Model Magic are easy to shape and safe for pets, making them a great pick.
- Non-toxic ink pads: Acid-free, pigment-based ink pads are gentle on your pet's skin while capturing detailed prints.
- Non-toxic craft paints: Washable, non-toxic craft paints are perfect for creating paw prints and make cleanup a breeze.
Always double-check product labels to ensure they don’t contain harmful chemicals. Once you’ve finished, clean your pet’s paws thoroughly to remove any leftover materials.
What’s the best way to get a clean paw print from my pet?
To capture a clean and detailed paw print, start by making sure your pet feels relaxed and at ease. A gentle paw massage and a few treats can help keep them calm and cooperative. Gather the essentials: a non-toxic ink pad or an inkless print kit, plain paper or cardstock, a damp cloth for cleanup, and extra treats as a reward.
Begin by cleaning your pet's paw with a damp cloth to remove any dirt or debris, then dry it thoroughly. Gently press their paw onto the ink pad, ensuring even coverage, and then press it onto the paper with steady pressure. If you’re using something like modeling clay, press their paw gently into the surface without forcing it. To avoid smudges, lift the paw straight up once the print is made. Allow the print to dry completely before handling it. Don’t forget to reward your pet with treats afterward to make the experience positive and enjoyable. This simple process creates a lovely paw print, perfect for keepsakes or creative projects.
What are some unique and creative ways to display pet paw print keepsakes?
Transforming your pet's paw print into a cherished keepsake is a heartfelt way to celebrate their memory. One classic idea is framing the paw print in a shadow box. This adds depth to the display, protects the imprint, and makes it perfect for showcasing on a wall or mantel. For something more refined, you could opt for a custom picture frame that combines the paw print with your pet's photo, name, and meaningful dates.
Another creative approach is to design a gallery wall. Use high-quality prints of the paw print in different sizes and arrange them in a cohesive layout for a striking visual tribute. If you’re drawn to tactile mementos, consider engraving the paw print onto a small stone or plaque, creating a lasting tabletop accent. For something functional, you can transform the print into a decorative coaster, plate, or even a custom wooden sign, blending the keepsake into your daily life.
These thoughtful options not only honor your pet but also seamlessly integrate their memory into your home, keeping them close in a way that feels personal and meaningful.