


A shadow box can go wrong for simple build reasons, not personal ones. In most cases, the same 5 mistakes cause the trouble: a box that is too shallow, no layout plan, the wrong backing, the wrong way to attach items, and poor long-term care.
If I wanted the short version, here it is:
- Measure the thickest item first so nothing presses against the glass
- Lay everything out before attaching anything
- Use a plain, acid-free backing for paper items
- Match the attachment method to the item’s weight
- Keep the box away from sun and heat
That’s the whole job in plain terms: fit, spacing, support, attachment, and protection.
A few details matter more than people think. For example, UV light can fade photos, and heat can weaken glue over time. Even a good-looking box can start to sag or discolor if the materials and placement are off.
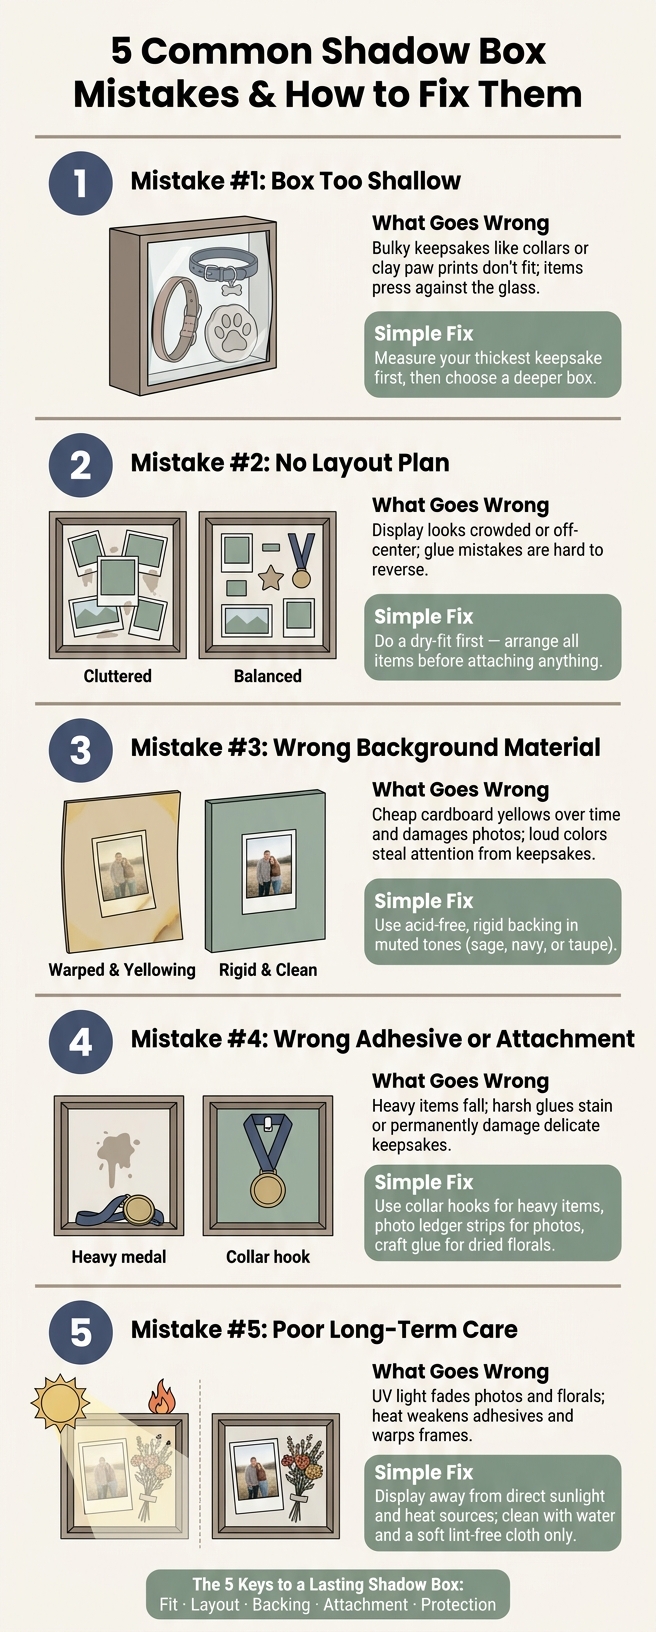
5 Shadow Box Mistakes to Avoid (And How to Fix Them)
Quick Comparison
| Mistake | What goes wrong | Simple fix |
|---|---|---|
| Box is too shallow | Items do not fit or touch the glass | Pick a deeper box after measuring keepsakes |
| No layout plan | Display looks crowded or off-center | Do a dry fit first |
| Wrong background | Items blend in or backing bends | Use rigid, muted backing |
| Wrong adhesive | Items fall, stain, or get damaged | Use hooks, strips, or glue based on the item |
| Poor long-term care | Fading, warping, or surface damage | Keep away from direct sun, heat, and harsh cleaners |
I see this article as a simple checklist: if I get those five parts right, the shadow box with clay paw print is more likely to look clean, hold the keepsakes in place, and last for years.
sbb-itb-c538f2f
What a Pet Memorial Shadow Box Should Do
A pet memorial shadow box needs to do two things well: protect keepsakes and look balanced on display.
Start by deciding what matters most. Is this box mainly for protection, for display, or a pet memory box for both? That choice shapes everything else.
If preservation is the main goal, the box should help shield fragile items from dust, light, and too much handling. If it's more of a display piece, it's meant to sit on a mantel, shelf, or bookcase and look clean and put-together. Once that purpose is clear, the layout gets much easier to plan.
A balanced display usually has one main focal point. In most cases, that's a clear photo that shows your pet's personality. Then you place smaller keepsakes around it, like a collar charm, paw print, or nameplate.
And that all starts with one basic thing: choosing a box that's deep enough to hold the items inside.
1. Picking a Shadow Box That Is Too Shallow
One of the most common mistakes is choosing a shadow box that’s too shallow. When that happens, you end up leaving out bulkier keepsakes because they simply won’t fit. Three-dimensional items like collars, charms, and dried flowers need extra depth. If the box is too shallow, pieces like a clay paw print or a collar may not fit at all.
Once you have a box that fits the keepsakes, the next issue is spacing. Give each item enough room so the display looks intentional instead of cramped.
The background matters too. Pick one that adds contrast so the keepsakes stand out. A kraft insert or chalk-painted backing can work well for this. A neutral background keeps the attention on the pet memorials.
After you settle on the layout, think about how each item will stay in place. Use collar hooks for heavier pieces instead of relying on adhesive alone. Save strong adhesive for lighter items like nameplates and backing.
2. Skipping the Layout Plan
Starting with glue is one of the easiest ways to throw off a shadow box. If you place items without a plan, the focal point can get lost and the whole display can feel uneven.
Do a Dry-Fit First
Before you attach anything, set all of your keepsakes on the backing and move them around until the arrangement feels right. This dry-fit test gives you a chance to pick a focal point, leave enough breathing room around it, and layer pieces so larger items sit behind smaller ones instead of hiding them. Group similar items, keep the focal point easy to spot, and place larger pieces behind smaller ones.
Once the arrangement looks balanced, take a second look at the backing. The background can change the whole feel of the piece. A neutral backdrop with some contrast helps keep the eye on the memorial items.
Test It in Place
After the dry fit, put the box where it will actually live and step back a few feet. Something that looks fine on a table can seem off once it's sitting on a mantel or bookshelf. Seeing it in its actual spot makes it easier to judge balance and see whether the display comes across as a meaningful tribute.
With the layout set, the next mistake is picking a backing that clashes with the keepsakes.
3. Using the Wrong Background Material
The backing does two jobs at once: it holds the layout in place and shapes the overall look. So even if your arrangement looks great on paper, it can still fall apart if the background fights the style or can’t handle the load. Once you’ve settled on the layout, the backing needs to support both the look and the weight.
Color and Contrast Matter More Than You Think
Go with a muted background that lets the keepsakes stand out instead of blending into the surface. Tones like sage, soft navy, or taupe tend to work well.
A loud or high-contrast background can steal attention from the items you actually want people to notice. The backing should act more like a stage than the main performer.
Pick a Backing That Can Handle the Weight
Choose a rigid backing when the contents have any real heft. Kraft inserts work well for lighter keepsakes. For heavier pieces, use wood memorial plaques as backing so the frame doesn’t sag over time.
Match the backing to both the weight and the tone of the keepsakes. That simple choice can save you from a frame that looks good on day one and droops a few weeks later.
| Background Material | Best For | Supports Heavy Keepsakes? |
|---|---|---|
| Kraft inserts | Light keepsakes, ribbons, dried florals | Light to medium only |
| Wood / plaques | Engraved nameplates, clay kits | Yes |
| Fabric / ribbon | Decorative layering | No - needs a rigid base |
Acid-Free Is Required for Paper Items
If you’re framing paper keepsakes, use acid-free backing to help prevent yellowing.
Once the backing is set, the next mistake is using the wrong adhesive.
4. Attaching Keepsakes with the Wrong Adhesives
Adhesives are easy to ignore, but they matter more than most people think. Use the wrong one, and a keepsake can get damaged or come loose over time. The safer move is to match the attachment method to the item's weight and how delicate it is.
Match the Method to the Item
Not every keepsake should be glued down. Dried florals can be secured with glue. But heavier pieces, like pet collars, need a different setup. Collar hooks are a better fit for bulky hardware because they use a mechanical hold instead of relying on adhesive alone.
Photos need a lighter touch. Photo ledger strips help keep images flat and in place.
When Adhesive Is the Wrong Tool
Some items are just too small or too fragile for standard adhesive. In those cases, resin casting can hold them in place.
| Keepsake Type | Recommended Method |
|---|---|
| Dried florals | Craft glue |
| Pet collars / hardware | Collar hooks |
| Photos | Photo ledger strips |
| Decorative paw prints | Adhesive vinyl |
| Small or fragile items | Resin casting |
The last mistake is overlooking long-term protection.
5. Overlooking Long-Term Protection
A shadow box can look perfect on day one and still start to break down later if you hang it in the wrong place. That’s the tricky part. Once the box is assembled, its placement and day-to-day care play a big role in how well it holds up.
Keep It Away from Light and Heat
Direct sunlight can cause permanent fading in photographs and organic keepsakes like dried florals or ribbons. That’s why sun-facing walls are a bad bet. If you want an extra layer of defense, UV-resistant glass can help limit fading.
Heat causes trouble too. A shadow box over a fireplace might look nice at first, but that spot exposes it to steady heat. Over time, that can weaken adhesives and warp wood frames.
Clean It the Right Way
When it’s time to clean the shadow box, keep it simple: use warm water and a soft, lint-free cloth. Skip bleach and acidic cleaners, which can harm surfaces and finishes.
Use the table below for a quick recap of the main risks and fixes.
| Factor | What It Damages | How to Prevent It |
|---|---|---|
| Light | Photos, dried florals, fabrics | Use UV-resistant glass and avoid sun-facing walls |
| Heat | Adhesives, wood frames | Keep away from fireplaces and radiators |
| Chemicals | Stone, wood, protective finishes | Use only water and a lint-free cloth |
Quick Reference Table: Shadow Box Mistakes and Fixes
Use this quick recap to pair each mistake with the simplest fix.
| Mistake | Why It Causes Problems | Better Approach |
|---|---|---|
| Picking a shadow box that is too shallow | Bulky keepsakes may not fit or may press against the glass. | Measure the thickest keepsake and choose a deeper box. |
| Skipping the layout plan | Hard-to-reverse glue makes mistakes difficult to fix, and the final display can look crowded or uneven. | Dry-fit all items first. |
| Using the wrong background material | Standard cardboard or cheap paper can yellow over time and damage photos and delicate fabrics. | Use acid-free, rigid backing. |
| Attaching keepsakes with the wrong adhesives | Heavy items may fall over time, and harsh glues can permanently stain or damage keepsakes. | Use hooks for heavy items and acid-free adhesive for light pieces, such as those found in memorial keepsake boxes. |
| Overlooking long-term protection | Sun and busy spots can damage the display. | Display on a mantel or bookshelf away from direct sun. |
Conclusion
A pet memorial shadow box can become a lasting tribute, but the result comes down to a few basic choices: depth, layout, materials, and protection.
If you avoid these common mistakes, the box is more likely to look balanced, keep your items safe, and hold up over time. Getting the depth right, planning the layout first, picking durable materials, using the right adhesives, and keeping the display out of direct sunlight are all simple steps. Skip even one, and the finished piece may not hold up the way you hoped.
For more ways to honor your pet, Pet Memory Shop offers pet memorial gifts and support resources.
A well-built shadow box keeps that memory close for years.
FAQs
How deep should a shadow box be?
The right depth comes down to what you want to place inside. Your frame should be deep enough to hold keepsakes like a pet collar, a favorite toy, or a small paw-print casting without pushing up against the glass.
Before you pick a frame, lay out each item and measure the total depth in inches. That gives you a clear sense of how much space you need for a balanced setup that also helps protect each piece.
What items work best in a pet memorial shadow box?
The best items are the ones that feel like your pet and remind you of the life you shared.
Popular choices include:
- a favorite photo
- their collar
- paw-print keepsakes
- small toys
- dried florals
- a custom nameplate
Pick a few pieces that mean something to you, and you’ll have a tribute that feels personal and heartfelt.
Can I hang a shadow box on the wall?
Yes, you can hang a shadow box on the wall. In fact, many are made for wall mounting and can work well as a focal point in your home.
People often place them on mantels or shelves, but hanging one on the wall is just as common. When you pick a spot, pay attention to lighting and how easy it is to see and reach. That way, your pet memorial stays meaningful and easy to enjoy.